Choosing the 2026 best injection molding at home machine requires more than comparing price tags. A compact machine may fit beside a workbench, yet still demand careful temperature control, mold preparation, and ventilation. The right choice depends on your materials, production goals, available space, and tolerance for hands-on adjustment.
John Bozzelli, a respected injection-molding educator and founder of Injection Mold Consulting, has emphasized, “The mold is the heart of the injection molding machine.” That principle matters at home. A reliable machine cannot compensate for poor mold alignment, uneven cooling, or unsuitable plastic pellets. Small defects become obvious quickly.
This guide examines practical machines for injection molding at home in 2026. It considers heating stability, clamping force, injection pressure, safety features, cleanup, and replacement-part access. It also looks at beginner-friendly controls and realistic operating costs. Some machines promise professional results in a desktop package. That promise deserves skepticism.
Home molding can be rewarding. It can also be messy, slow, and unexpectedly expensive. A warm-up cycle may take longer than expected. A simple part may require several mold revisions. My own evaluation would not ignore those frustrations. They reveal whether a machine is genuinely usable or merely impressive in a product listing.
Readers should treat this comparison as a practical starting point, not a guarantee. Always follow the manufacturer’s instructions, use approved materials, and maintain suitable ventilation. Safe experimentation matters more than speed. The best machine is the one that supports repeatable results without turning every project into a repair job.
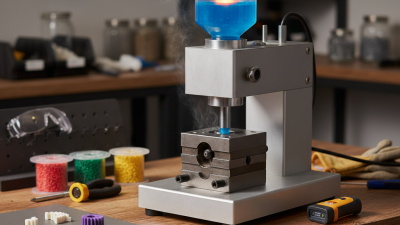
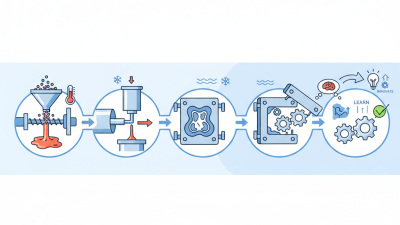
What is an injection molding machine for home use? It is a compact forming system for making repeated plastic parts. The machine heats plastic pellets until they become fluid. A screw or plunger then pushes the material into a shaped mold. Pressure holds the plastic against the mold walls. After cooling, the mold opens and releases the part. Small desktop models usually support manual or semi-automatic operation. They suit prototypes, repair parts, craft projects, and short production runs.
A home machine needs more than a small footprint. Check its clamping force, injection volume, temperature range, and electrical requirements. These specifications decide which materials and mold sizes are practical. A stable workbench matters. So does ventilation. Hot plastic can produce unpleasant fumes, especially when overheated. Use known materials, follow the operating manual, and keep guards in place. Never reach into the mold area during a cycle. Keep children and loose clothing away.
In practice, the learning curve can feel longer than expected. I once underestimated cooling time, and thin parts warped near the gate. That mistake showed me why trial records matter. Note the material, temperature, pressure, cooling time, and result after every test. Mold design also affects success. Sharp corners, uneven wall thickness, and poor venting can cause weak or incomplete parts. A home machine can be useful, but it still demands patience, measurement, and honest attention to its limits.
Home-use injection molding machines are compact systems designed for prototyping, small-batch production, education, and maker projects. The chart compares representative clamping-force ranges for common machine types. A higher clamping force supports larger projected part areas, while manual and low-force machines are generally more affordable, compact, and suitable for smaller plastic parts.
Values represent typical specifications found across commercially available benchtop and workshop-scale machines; actual performance depends on mold design, plastic material, injection pressure, and machine configuration.
How Home Injection Molding Machines Work
A home injection molding machine turns plastic pellets into small, repeatable parts. The process begins inside a heated barrel. A screw or plunger melts the material, then pushes it into a closed mold. Pressure fills narrow cavities, including ribs, holes, and textured surfaces. After cooling, the mold opens and the part is removed by hand.
Small machines usually use manual or semi-automatic controls. Typical operating temperatures range from about 180°C to 300°C, depending on the plastic. Mold temperature matters too. A cold mold can create flow lines, weak corners, or incomplete filling. A digital thermometer and a simple pressure gauge provide useful control. They do not guarantee quality.
The machine’s size limits the part. Home users should check clamping force, injection volume, nozzle alignment, and mold compatibility. A practical test is a small, flat sample with visible ribs. It reveals air traps and uneven cooling quickly. According to the OECD’s Global Plastics Outlook, global plastic waste reached 353 million tonnes in 2019, while only 9% was recycled. That figure makes material selection important. Clean, known pellets are safer for consistent results than unknown mixed scraps. The 2024 State of the Industry report from the Plastics Industry Association also shows how strongly plastics manufacturing depends on process efficiency and material management. My own caution is simple: advertised precision can exceed real workshop performance. Heating, clamping, and cooling often vary more than expected. Loose records of temperature, cycle time, and defects can expose that gap.
Choosing the best injection molding machine for home use requires more than checking price or advertised output. Compare clamping force first. It must hold the mold closed without visible flashing around the part. Match the shot size to your planned material volume, not your largest possible project. Small test parts need less capacity.
Temperature control also deserves close attention. Stable heat improves consistency, especially with engineering plastics. Look for separate controls for each heating zone, clear temperature readings, and overload protection. A compact screw system can provide better mixing than a simple plunger, but it may require more cleaning. Check mold compatibility, power requirements, ventilation needs, and available replacement parts. Read the technical manual before purchasing. Some specifications sound impressive yet hide practical limits.
Tips: Keep a record of temperature, pressure, cooling time, and defects during every test. That log often reveals problems faster than visual inspection. Choose a machine with accessible safety guards and emergency controls. Never ignore local electrical and workplace requirements. A quieter motor may matter in a home workshop. No machine is perfect. Even a reliable unit can produce warped parts when cooling is uneven. I would also leave extra budget for molds, protective equipment, maintenance tools, and failed trials. My first comparison might focus too much on automation; in practice, simple adjustments and dependable service can matter more.
| Machine Type | Typical Clamp Force | Typical Shot Weight | Injection Pressure | Compatible Materials | Electrical Requirements | Typical Cycle Time | Recommended Mold Size | Ease of Use | Best Use Case | Main Limitations |
|---|---|---|---|---|---|---|---|---|---|---|
| Manual benchtop injector | Manual clamping; commonly suitable for small molds and low-volume parts | 5–30 g per shot | Approximately 5–15 MPa, depending on lever force and nozzle design | PP, PE, PS, ABS, TPE and other low-temperature thermoplastics; material preparation is important | No power or 110–240 V heater circuit; usually 300–800 W | 2–8 minutes, including heating, injection, cooling and mold opening | Small molds, generally up to about 100 × 100 mm | Moderate; requires manual control of pressure, temperature and cooling time | Learning, prototyping, educational work and very small production runs | Low repeatability, limited part size and significant operator involvement |
| Pneumatic benchtop injector | Approximately 1–5 tonnes, depending on air pressure and cylinder size | 10–60 g per shot | Approximately 10–35 MPa | PP, PE, PS, ABS, nylon and selected engineering plastics when adequate barrel temperature is available | 110–240 V; typically 500–1,500 W, plus a clean compressed-air supply | 45–180 seconds for small parts | Small to medium molds, commonly up to about 150 × 150 mm | Good; pneumatic actuation provides more consistent force than manual operation | Repeatable prototypes, maker workshops and short-run parts | Requires an air compressor, and pressure stability affects part quality |
| Servo-electric desktop injector | Approximately 2–8 tonnes | 15–100 g per shot | Approximately 20–80 MPa | PP, PE, PS, ABS, PA and other thermoplastics within the machine’s temperature range | 110–240 V; commonly 800–2,500 W | 20–90 seconds, depending on wall thickness and cooling requirements | Small to medium molds, commonly up to about 200 × 200 mm | Very good; programmable temperature, injection speed and holding time are available on many units | Functional prototypes, repeatable small-batch production and engineering development | Higher purchase cost, more complex controls and greater sensitivity to mold alignment |
| Hydraulic benchtop machine | Approximately 5–20 tonnes | 30–250 g per shot | Approximately 40–120 MPa | PP, PE, PS, ABS, PC, PA and other materials supported by the barrel and screw temperature range | 220–240 V is common; typically 2–7 kW | 30–120 seconds for small and medium components | Medium molds, commonly up to about 250 × 250 mm | Good for experienced users; hydraulic pressure and process settings require proper adjustment | Larger prototypes, stronger parts and higher-volume home or workshop production | More noise, heat, maintenance and safety considerations than electric systems |
| Vertical insert-molding machine | Approximately 2–15 tonnes | 10–150 g per shot | Approximately 20–100 MPa | PP, PE, ABS, PA, TPE and other materials suitable for the installed heating and injection system | 110–240 V; commonly 1–5 kW | 25–120 seconds | Small to medium molds with easy access for inserts and overmolding fixtures | Good; vertical access simplifies placement of metal inserts and prepared components | Overmolding, cable assemblies, threaded inserts and small technical components | Often less suitable for large flat parts and may require custom fixtures |
| Temperature-controlled hobby injector | Approximately 1–6 tonnes | 5–50 g per shot | Approximately 10–45 MPa | Commonly PP, PE, PS, ABS and low-temperature thermoplastics; verify maximum barrel temperature before using nylon or PC | 110–240 V; typically 400–1,500 W | 60–240 seconds | Small molds, generally up to about 150 × 150 mm | Good for beginners when equipped with digital temperature control and safety interlocks | Home prototyping where affordability, compact size and simple operation matter most | Limited pressure, shot size and thermal uniformity compared with production equipment |
Buying priorities for home use: confirm the required clamp force, shot size, maximum material temperature, available electrical circuit, ventilation needs, mold compatibility, guarding, emergency-stop access and spare-part availability before purchase.
Choosing the best materials and products matters more than machine size in home injection molding. Polypropylene is a practical starting material because it flows well and tolerates repeated handling. Polyethylene works for flexible containers, simple covers, and small storage parts. ABS can produce stronger, more rigid pieces, but it needs better temperature control and ventilation. Avoid unknown recycled pellets at first. Their moisture and mixed additives can change the result.
Useful home products include measuring scales, drying containers, temperature probes, trimming tools, and removable steel or aluminum molds. A basic mold should have smooth cavities, clear parting lines, and enough draft for easy release. Small parts with even wall thickness usually cool more predictably. I have found that a simple mold teaches more than a complicated decorative design. Keep a written record of material type, heating temperature, injection pressure, cooling time, and visible defects.
Safety remains part of material selection. Heated plastic can release irritating fumes, especially when overheated or contaminated. Use strong ventilation, heat-resistant gloves, eye protection, and a stable work surface. Never melt unidentified plastics. Moisture causes bubbles, silver streaks, and weak surfaces, so dry hygroscopic materials according to their technical data. Results may still vary. Home machines often lack precise pressure control, and my first settings were rarely correct. Small adjustments are normal, but careless experimentation is not.
A home injection molding machine should be judged by safety, maintenance, and total operating cost, not just purchase price. Heated barrels can exceed 200°C, so guards, stable placement, insulated handles, and emergency power controls matter. Keep the machine on a nonflammable bench with clear space around it. Good ventilation is essential because some plastics release irritating fumes when overheated. Wear safety glasses and heat-resistant gloves, but never treat protective equipment as a substitute for careful operation.
Maintenance is usually simple, but neglect becomes expensive. Clean the nozzle after each session, remove leftover material, and inspect wiring before use. Lubricate moving parts according to the manual. Check temperature readings regularly; an inaccurate sensor can ruin parts or create a serious hazard.
Operating costs include electricity, pellets, mold wear, cleaning tools, and failed test pieces. Small machines may use modest power, yet repeated heating cycles add up. Cheap material can also create jams and wasted batches. I sometimes underestimate setup time, especially when changing molds. That mistake affects the real cost more than expected.
Tips: Keep a maintenance log. Weigh material before each project. Start with small batches. Store plastics dry and labeled. Let the barrel cool before cleaning. Review ventilation and electrical safety every few months. A simple checklist feels unnecessary until something goes wrong.